2.4. Transaction management
- This chapter provides guidence to add/search/edit/copy/delete transaction.
- Go to Master menu >> Create voucher.
2.4.1. How to pass a transaction
Below table will help the user to understand, voucher types and their respective accounts as per rule:
Voucher type
Accounts(dr)
Accounts(cr)
Contra
subgroup(Cash,Bank)
subgroup(Cash,Bank)
Journal
except subgroup(Cash,Bank)
except subgroup(Cash,Bank)
Receivable
subgroup(Cash,Bank)
except subgroup(Cash,Bank)
Payment
except subgroup(Cash,Bank)
subgroup(Cash,Bank)
Debit Note
- subgroup(Sundry Creditors for Expense
,Sundry Creditors for Purchase)
- group(Direct Income,Indirect Expense,
Fixed Assets)
Credit Note
- groupname(Direct Income,Indirect
Income)
subgroup(Sundry Debtors)
Sales
subgroup(Cash,Bank,Sundry Debtors)
groupname(Direct Income,Indirect Income)
Purchase
- groupname(Direct Expense,Indirect
Expense)
subgroup(Sundry Creditors for Expense, Sundry Creditors for Purchase,Bank,Cash)
Sales Return
- groupname(Direct Expense,Indirect
Expense)
subgroup(Sundry Debtors)
Purchase Returns
- subgroup(Sundry Creditors for Expense
,Sundry Creditors for Purchase)
- groupname(Direct Income,Indirect
Income)
Here, on this page we can record transactions in ABT.
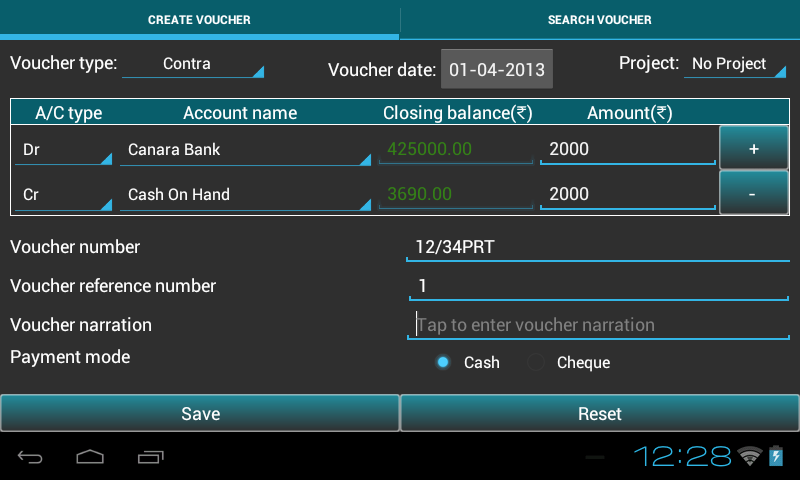
- It has been designed with user-friendliness in mind, with a default chart of accounts as a starting point. However, you have to create at least two accounts to start any transaction. It also offers every opportunity for creating your own user-defined variations.
- So, Let us start creating a new voucher.
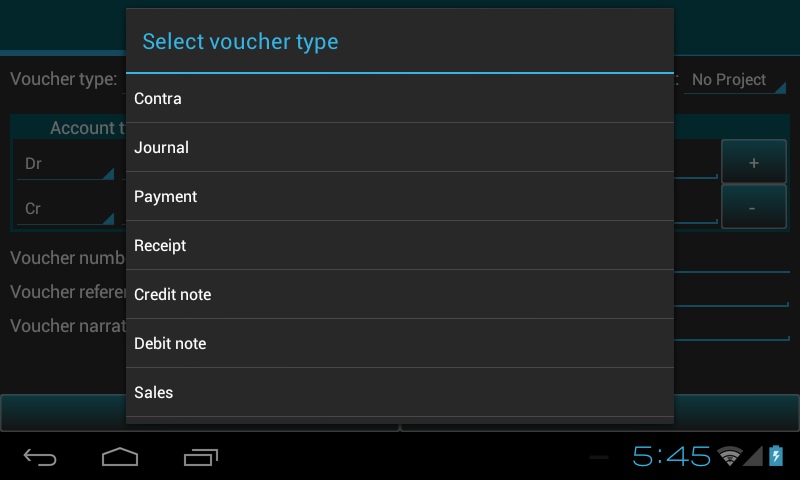
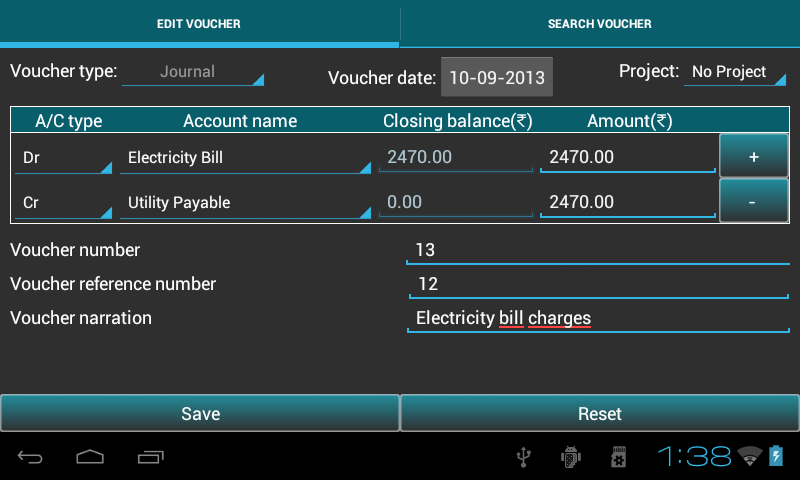
- Select the type of transaction from the dropdown list of Voucher type. Type of transaction can be Contra, Journal, Payment, Receipt, Debit Note, Credit Note, Sales, Sales Return, Purchase, Purchase Return.
- Voucher Date - date on which the transaction is happened.
- Note: ABT sets financial date as Voucher date, if no transaction is recorded before. If any transaction is previously recorded,it sets the voucher date of the previous transaction of the respective voucher type. If the date is changed, it updates the by default date or previous date with the new date.
- Project - The project module is organized with project-based work processes in mind. This module is also closely integrated with other modules in the program. The Project register can be opened by going to Ledger -Select project name- View.
- ABT populates drop down of account name by Voucher type rule. Select the Account name for Dr and Cr side. It will automatically show the closing balances for both the account name. Debit balance are highlighted in Green color and Credit balances are highlighted in Red color.
- Default focus helps you make voucher entry more efficient. For example, If you register a journal item in journal entry, the setting will guide you to the correct field. This is set based on the Accounting Principles, Debit what comes in; credit what goes out, Debit the receiver; Credit the Giver, Debit all Expenses and losses; Credit all incomes and gains.
- This also helps in selecting multiple debit or credit sides using plus button.
- Amount - enter the amount.
- Now, add Voucher number and Voucher reference number. Voucher number must be unique as vouchers are meant for different purposes. There is difference between Voucher number and Voucher reference number. There can be many vouchers with same voucher reference number.
- Voucher Narration is also a mandatory field.
- Payment mode - There are 2 options to make payment: Cheque or Cash. If you select Cheque option, Cheque number need to be filled. Payment mode is not available for vouchers Debit Note, Credit Note and Journal.
- Press Save to save transaction. The closing balance gets updated as the voucher is saved.
- After saving transaction it resets all the fields automatically.
- You can change the voucher type if you want to make different voucher entries.
- Press Reset to clear all fields.
- To indicate the transfer of funds from cash to bank, bank to bank and bank to cash contra type is used.
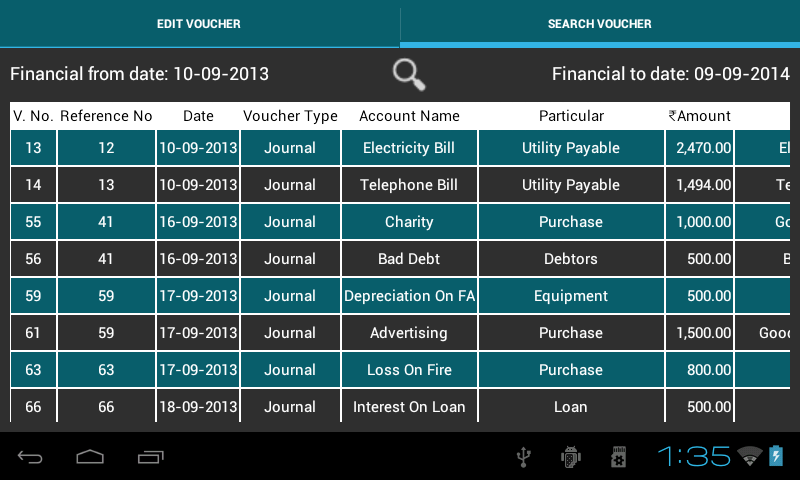
2.4.2. Search/Edit/Clone/Delete Transaction
- To manage transaction select Search voucher tab. Depending on the Voucher Type selected, we get the list of created vouchers in table.
- You can see the financial period at the top.
- Tap on the Search icon, at the top middle of the screen.
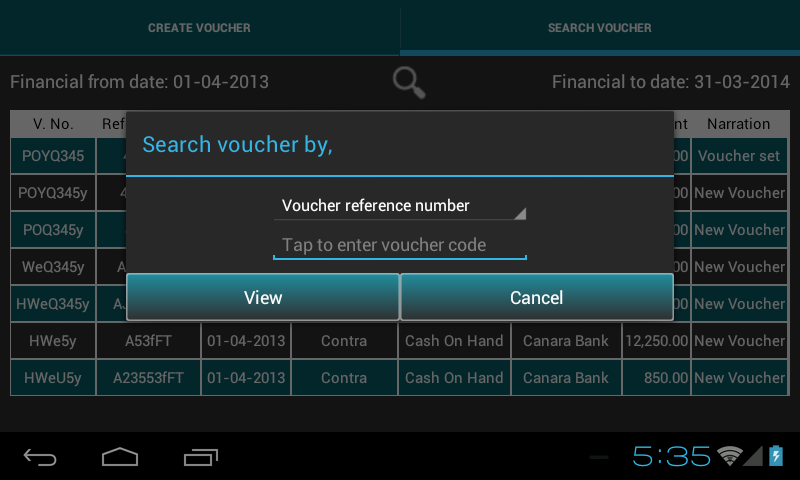
- You can search vouchers in a number of ways such as Voucher reference number, Date, Narration, Voucher number, Account name and Voucher type.
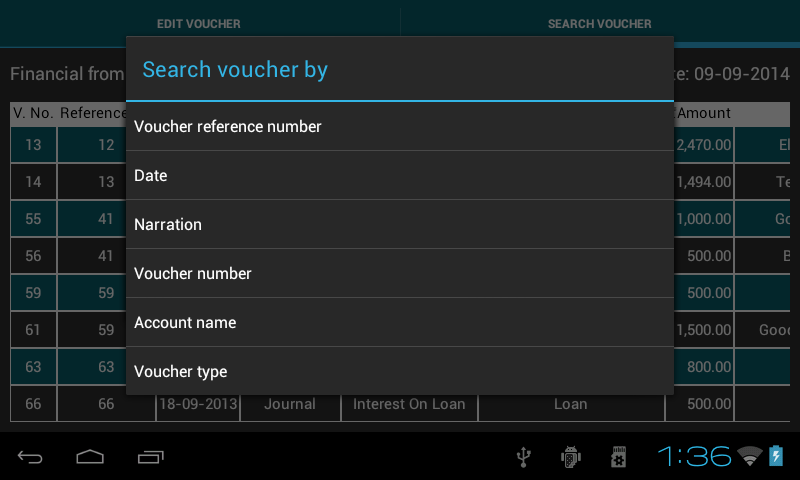
- Select option, give the input and press View button to view the transaction.
- Long press on the row on which you want to perform any of these tasks: Edit voucher, Copy voucher and Delete voucher.
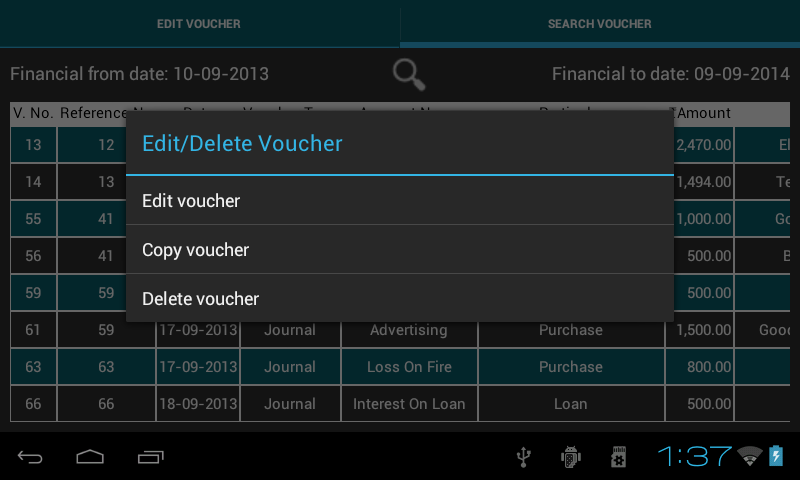
- Tap on Edit Voucher option to edit the selected voucher. It will take you to the Edit Voucher tab. Except Voucher number and Voucher type, all other fields are editable.
- Select Copy voucher option, to make a copy of the voucher. Copy voucher duplicates information on an existing transaction, to create a new one with all the fields pre-filled for the same voucher type. There is an option to keep or change the existing field values. It is mandatory to change Voucher Number as this is a unique parameter. Change the Cheque No as cheque number differs in different transactions. Press Save to save the transaction.

- Delete voucher: Tap on Yes to delete the voucher.